How to BBQ Ribs on Charcoal Grill: A Two-Zone Guide
You've got a rack in the fridge, charcoal in the shed, and people arriving later who expect ribs that bend, bite clean, and don't taste like an ashtray. The usual failure is simple. The outside looks dark and done, so you serve it, while the meat near the bone is still tight. Learning how to BBQ ribs on charcoal grill properly means running two tests at once, one for tenderness and one for safety, and keeping a steady indirect fire long enough for both to pass.
Ribs Temperature and Time Targets at a Glance
Set your numbers before you light anything. You're cooking indirectly, not grilling over flames, so you need a grate temperature of 110 to 135°C and enough patience to hold it there with the vents.
| Rib cut | Grate temperature | Approximate cook time | Minimum internal temperature | Texture cue |
|---|---|---|---|---|
| Baby back ribs | 110-135°C | About 4-5 hours | 75°C at thickest point | Rack bends, surface cracks, probe slides between bones |
| Spare ribs | 110-135°C | About 5-6 hours | 75°C at thickest point | Rack bends well, meat pulls back from bone ends |
| St Louis-style spare ribs | 110-135°C | About 5-6 hours | 75°C at thickest point | Squared rack bends, probe slides with little resistance |
Why the Clock Is Only a Guide
Those times shift with rack size, charcoal quality, wind, and how often you lift the lid. A compact kettle on a cold, breezy patio won't behave like the same grill on a still evening. Treat time as a prompt to start checking, not as permission to serve.
The UK Food Standards Agency BBQ food safety guidance recommends checking the thickest part with a thermometer reaching at least 75°C, because food can look charred while remaining undercooked inside. That's the safety line. Tenderness is separate, and ribs usually need to go well past that minimum before the meat relaxes, so you still use the bend and probe-slide cues for texture.
Practical rule: Write down your target grate temperature and your first check time before lighting the fire. You'll make calmer vent decisions if the target is already decided.
Once cooked, hot food should be held at 63°C or above if you're not serving straight away. If you haven't used a probe much, this guide to using a meat thermometer properly covers placement without the guesswork. Pick 120°C as a working grate target if you want one number, then let the probe, not bark colour, call the finish.
Choose Your Rub Before You Prep
Choose the flavour before the ribs hit the board. A clear plan keeps the seasoning balanced and avoids piling on blends that compete.
For a savoury base, SPG (Salt Pepper Garlic) Base Blend works on its own or beneath a bolder pork rub. Add it first, then keep the top layer focused.
For a smoky pork flavour, use Hickory Hog Pork Rub alone or over the SPG base. Smokey Rebel's pork rubs are designed for pulled pork, sticky ribs, pork belly burnt ends and midweek chops, so they suit more than one kind of cook.
For a fruit-led finish, save Cherry Force BBQ Rub for later in the cook. Its sugar can scorch over prolonged heat, so use it for the final stretch rather than the first coat.
Buying More Than One
The Pork Essentials 4-Pack is a set of pork rubs. To combine pork, chicken or beef seasonings, choose options through the Build Your Own Bundle page.
Smokey Rebel's blends draw on global spices without fillers. Compare the options in this guide to dry rubs for ribs, then settle on a simple route: SPG alone, SPG with a pork rub, or Cherry Force near the end.
Prepping Ribs and Applying the Rub
Good bark starts at the board. Rush this stage and you'll spend five hours cooking a rack that was never set up to take smoke or seasoning evenly.

The Five-Step Routine
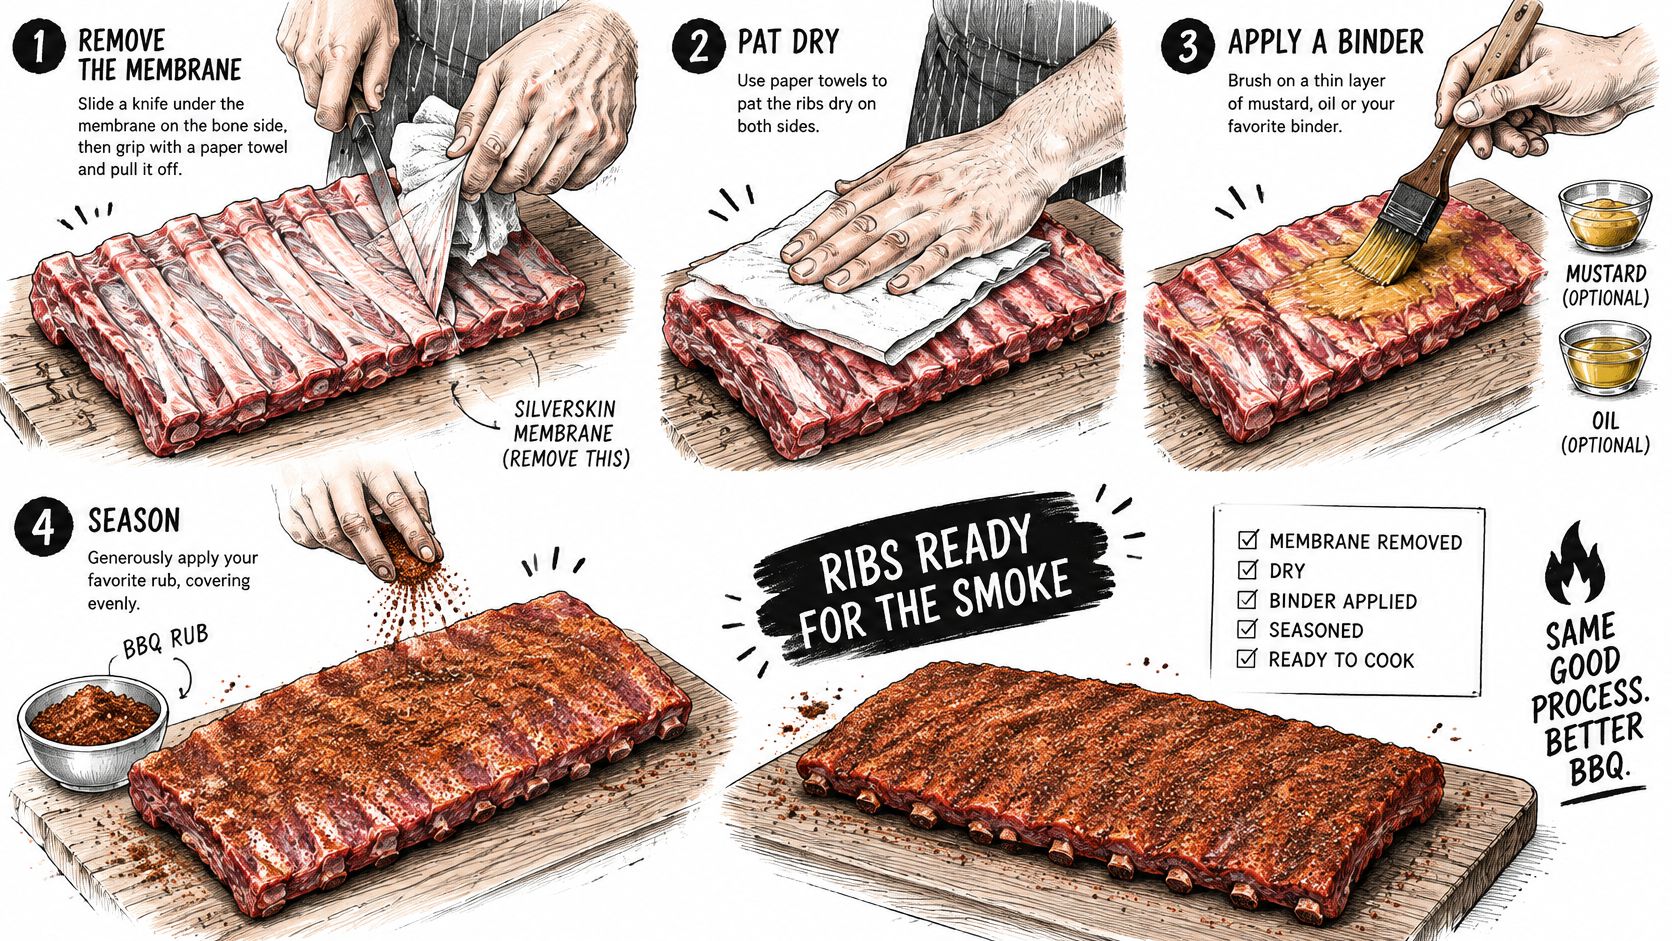
- Remove the membrane: Slide a blunt knife under the silvery membrane on the bone side, lift a corner, grip it with paper towel, and pull it away. Leave it on and it blocks rub and smoke while cooking into a papery chew.
- Pat the rack dry: Use paper towel on both sides until the surface feels tacky, not wet. A wet rack steams under the rub, and that steam pushes seasoning off instead of setting it.
- Add a thin binder: Brush on yellow mustard or a little oil, just enough to gloss the meat. You're making glue, not sauce. Too much turns the rub into paste that slides into the drip tray.
- Apply rub evenly: Shake from a height for an even fall, cover the edges and ends, then press gently with your palm. Don't rub it around like sandpaper. That tears the coat and leaves clumps that scorch.
- Rest it cold: Cover and refrigerate for an hour, or overnight for deeper seasoning. Keep raw ribs away from cooked food and salads in the fridge, on a low shelf where nothing can drip onto ready-to-eat items.
Mistakes That Show Up Later
A heavy coat looks generous and cooks badly. Thick patches stay gritty, scorch first, and hide bare spots underneath. Aim for full coverage where you can still faintly see meat through the seasoning.
Don't leave a seasoned rack sitting warm on the counter while the grill slowly comes up to temperature. Season it, chill it, and bring it out when the fire is stable. Cold meat also takes smoke well in the early stage, so there's no flavour penalty for keeping it refrigerated.
A ready rack looks evenly coloured, tacky rather than dusty, with no bare patches and no rub falling off when you lift one end.
Layering helps if you want depth without harshness. Put the SPG base down first for salt and garlic backbone, then your bolder pork rub over the top. Do the bone side first and the meat side last, so the presentation side doesn't get smeared by turning the rack over on the board.
Setting Up a Two-Zone Charcoal Fire
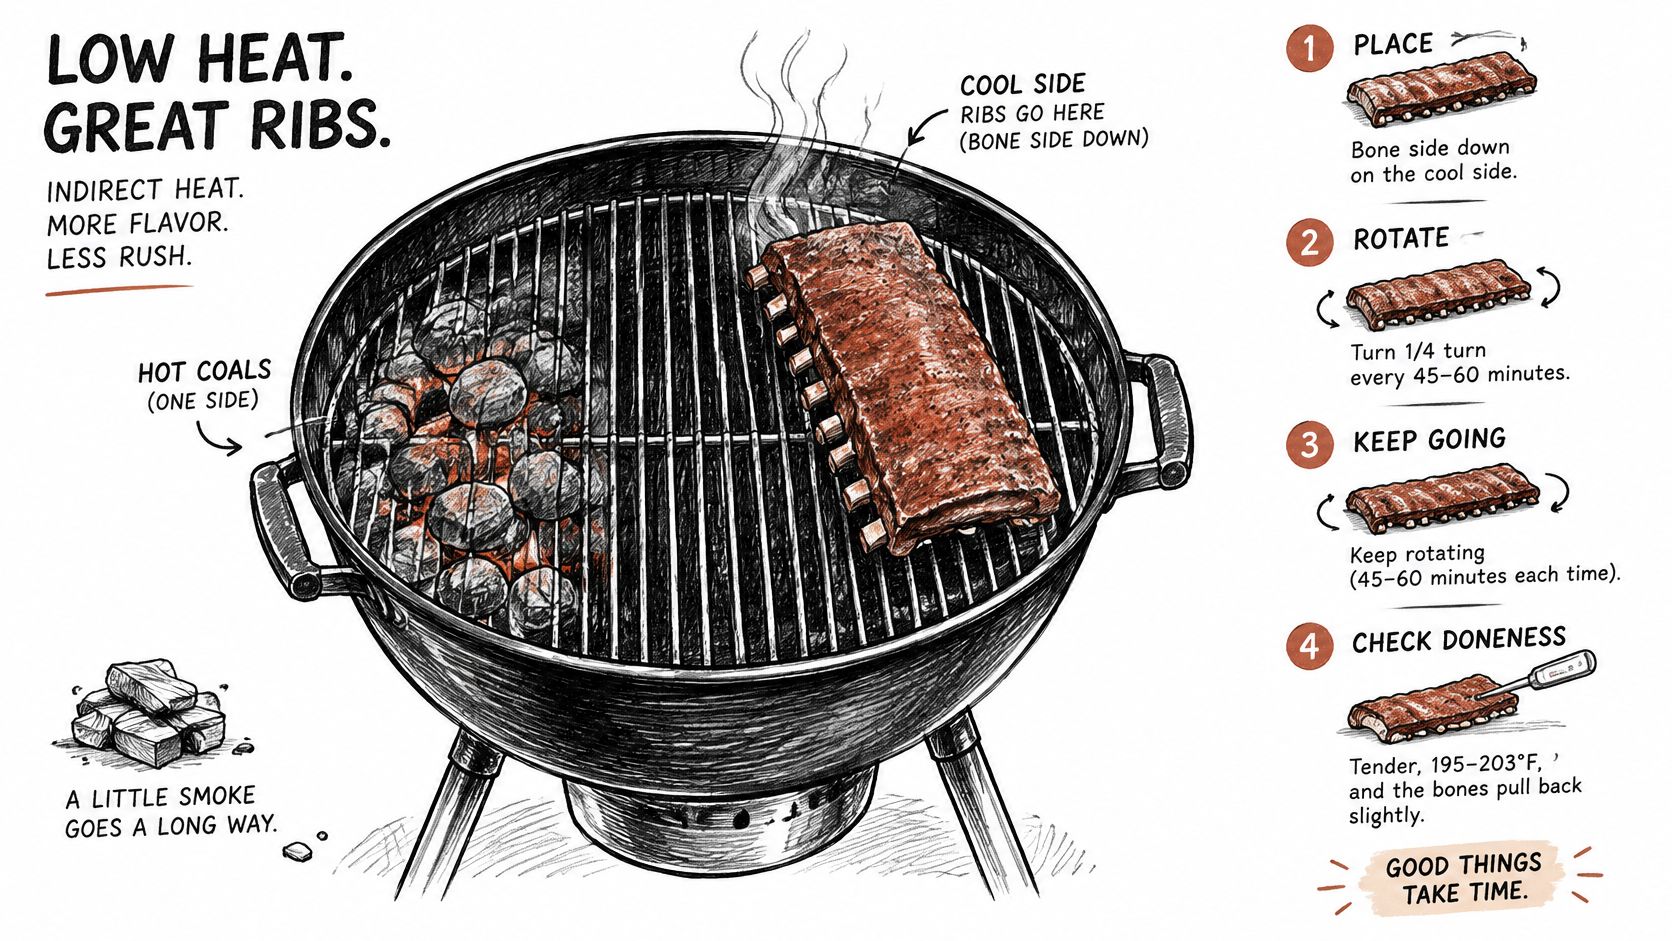
A rack of ribs needs steady indirect heat, not a bed of coals beneath the meat. Bank the charcoal on one side of the grill and leave the other side clear. The hot side gives you control over the fire; the coal-free side is where the ribs cook.
- Measure the fuel: Use enough charcoal to cover the barbecue base in one even layer. Avoid piling it higher, since extra fuel makes flare-ups harder to control. Too little may not hold heat through the cook.
- Light with a chimney starter: Fill the chimney and light it from below. Skip lighter fluid, which can leave fumes around the grill as the charcoal heats.
- Wait for grey coals: Let the flames die back before spreading the charcoal. The coals are ready when they glow and have a grey, powdery surface.
- Bank coals to one side: Tip the lit charcoal onto one half of the grate, leaving the other half empty for the ribs.
- Add a drip tray: Place a foil tray on the empty side beneath the cooking area. It catches fat and keeps drips off the coals.
- Settle the grill: Fit the grate, close the lid and leave the vents half open. Give the grill 10 to 15 minutes to settle at 110 to 135°C before cooking.
Fuel Quality and Airflow
Choose suitable charcoal and cook outdoors with good ventilation. Charcoal smoke can contain carbon monoxide and particulate matter. Never use a barbecue in a tent, under an awning, in a caravan or in any enclosed space. Leave the grill in place until the charcoal and ashes are fully cool.
Wind can push oxygen through the bottom vent and drive the temperature up. Turn the grill so that vent does not face directly into the wind. Make small vent adjustments, then give the temperature time to respond before changing anything else.
Add small amounts of unlit charcoal at the edge of the lit coals if the fire needs more fuel. Avoid tipping in a fresh chimney, which can cause a sudden temperature rise. For a clearer explanation of vent control and fire setup, follow this guide to cooking on a charcoal grill. The same care with direct heat can help when cooking steaks confidently with Recipe One.
Cooking Ribs Indirectly and Checking Doneness
Place the ribs bone-side down on the cool side, meat side up, with the thickest end furthest from the coals. Close the lid and position the lid vent over the ribs so heat and smoke draw across the meat on their way out.

The Turning Routine
- Rotate every 45 to 60 minutes: Turn the rack end to end so the side nearest the coals doesn't dry out or colour too fast. You don't need to flip it meat-side down.
- Protect thick sections: Keep the thickest meat away from direct heat. Thin ends can tolerate the warmer edge of the indirect zone better.
- Work the vents, not the lid: Hold 110 to 135°C with small bottom and lid vent adjustments. Every lid lift dumps heat and adds time you can't accurately predict.
- Wrap only after bark sets: Once the surface is deep mahogany and the rub doesn't smear when scratched, you can wrap in foil with a splash of liquid for one to two hours to speed tenderising. Unwrap briefly at the end so the bark firms up again.
- Finish briefly if needed: Use the direct side only for a short finish or to set sauce. Minutes, not half an hour, or sugar burns and edges char.
Use wood sparingly. One or two small chunks on stable coals give clean smoke flavour. Piling wood on makes thick, bitter smoke and gives you no extra tenderness for the trouble.
The clip below shows the indirect placement and lid discipline in action, which is easier to copy once you've seen the coal layout from above.
Two Different Tests
Bark colour and the bend test tell you about texture. They don't prove safety. The UK Government guide to common BBQ blunders warns that pork must be steaming hot throughout, with no pink meat visible in the thickest part and clear juices, and UK local-authority guidance advises a minimum core temperature of 75°C at the thickest point.
Probe between the bones into the centre of the thickest meat. Don't rest the tip against bone, because bone reads hotter and lies to you. Check two spots if the rack is uneven, and clean the probe before it goes back into cooked meat after touching anything raw.
Low and slow isn't a food safety method on its own. Tenderness answers "does it eat well", and the probe answers "is it safe". You need both answers to be yes.
Serve when the rack bends and cracks on the surface when lifted from one end, a probe slides between bones with little resistance, and the thickest meat reads at least 75°C. If it's tender but under temperature, keep cooking. If it's at temperature but still tight, keep cooking too, because safe and tough is still a failed rack.
Resting, Slicing and Serving Safely
Pull the rack onto a clean board and rest it loosely covered with foil for 10 to 15 minutes. Tent the foil rather than wrapping it tight. Tight foil steams the bark you spent hours building, while a loose tent lets juices settle back into the meat.
Slicing Without Shredding
Turn the rack bone-side up so you can see exactly where each bone runs. Slice between bones with a sharp knife in one clean stroke per rib where you can. Sawing tears the bark and pushes juices onto the board.
Wash any board, knife, tongs, or plate that held the raw rack before cooked ribs touch it. Cooked ribs go onto a clean plate, always. Putting finished meat back onto the raw-meat plate is the easiest way to undo a safe cook at the last second.
Holding Rules
- Serve hot: Hold cooked ribs at 63°C or above if there's a gap before eating, in a low oven or covered on the cool side of the grill.
- Chill leftovers promptly: Refrigerate within two hours and keep cold food below 5°C.
- Bin what's been out too long: Food left sitting out beyond that window shouldn't be rescued for tomorrow.
Say you're serving family at 6pm and the ribs finish at 5.20pm. Rest them, hold them warm and covered, slice at the table, and get leftovers into the fridge well before 8pm. That sequence sounds fussy until you've had a barbecue where cooked and raw plates got mixed up in a busy kitchen.
Slice when rested, serve steaming hot, and refrigerate what's left without leaving it to cool on the counter for the evening. That's the serving rule, and it doesn't change with rub, sauce, or charcoal type.
Fixing Tough, Dry or Bitter Ribs
Tough ribs after a long cook are the most common complaint, and the cause is rarely bad meat. A pit that runs below target for long stretches, or a lid opened every twenty minutes, can leave connective tissue tight even after hours on the grill. Keep the fire steady and give the ribs time.
| Symptom | Likely cause | Fix |
|---|---|---|
| Tough meat after five hours | Pit ran below 110°C or the lid opened often | Restore 110–135°C with the vents and cook longer. Check tenderness with a probe between the bones |
| Bitter, acrid smoke taste | Too much wood or smoke from unlit or poorly lit charcoal | Use small wood chunks and add them only once the coals are fully lit |
| Charred outside, undercooked near bone | Ribs sitting over direct heat | Move the rack to the cool side, close the vents slightly, and check for 75°C at the thickest point |
| Dry, stringy meat | Overcooking or wrapping for too long | Shorten the wrap and check earlier. Rest before slicing |
| Flare-ups from dripping fat | Fat falling onto hot coals | Trim excess fat, keep the drip tray in place, and move the rack away from flames |
| Pit temperature swings | Coal bed shrinking or vents adjusted too often | Add small amounts of unlit charcoal and adjust the vents in small steps |
| Burnt sugary rub or sauce | Sugar applied too early | Apply sugary sauce only in the last 15–20 minutes |
What You Can Fix Today
During the cook, move the rack, adjust a vent slightly, add a few coals, or hold back the sauce. Changes such as using a smaller wood chunk, shortening the wrap, or trimming fat more carefully are for next time. Make one adjustment at a time so you can tell what helped.
Change one thing at a time: If you move the rack, shut the vent, and add charcoal together, you won't know which adjustment helped.
Bitter ribs usually point to dirty smoke. Fully lit coals produce cleaner smoke; smouldering wood can make it thick and acrid. Stop adding wood and open the airflow slightly until the smoke thins.
Keep food safety separate from tenderness. The Bromley Council barbecue safety leaflet gives a standard of at least 75°C for 2 minutes throughout, measured in the centre of the thickest section. Reaching 75°C is the safety check, not proof that the ribs are tender. If the meat is still tight, keep the fire steady and cook longer, checking tenderness with the probe rather than judging by colour alone.
Frequently Asked Questions
How Long Do Ribs Take on a Charcoal Grill
Baby back ribs take about 4 to 5 hours and spare or St Louis-style ribs about 5 to 6 hours at 110 to 135°C indirect. The probe decides when they're done, not the clock.
What Internal Temperature Is Safe for Pork Ribs
Probe the thickest part of the meat between bones, away from bone, and reach at least 75°C. The meat should be steaming hot throughout with clear juices and no pink meat in the thickest part.
Can I Use Lighter Fluid to Start the Charcoal
Avoid it. Light with a chimney starter instead. Excess lighter fluid adds fumes and dirty smoke at exactly the point where you want a clean, stable fire.
Why Are My Ribs Tough Even Though They Reached 75°C
Because safety and tenderness are separate tests. 75°C means the pork is safe. It doesn't mean the connective tissue has relaxed yet, so a cool pit or frequent lid lifting can still leave you with tight meat that needs more time at temperature.
Can I Cook Ribs Indoors or Under an Awning
No. Charcoal barbecues are for outdoor use only, never indoors, in a tent, under an awning, or in a caravan. Keep strong ventilation around the grill for the whole cook and while coals cool afterwards.
Ready to put the two-zone method to work with seasoning that doesn't need babysitting? Our small-batch pork rubs, SPG base, and bundle options are built for exactly this kind of steady charcoal cook, with authentic flavour and no fillers. Visit Smokey Rebel to pick your rub before your next rack goes on.
Join our Mailing List
Sign up and get Smokey Rebel Recipes + weekly recipes straight to your inbox!
Recent articles
How to BBQ Ribs on Charcoal Grill: A Two-Zone Guide
How to BBQ Ribs on Charcoal Grill: two-zone set-up, 110-135°C pit temperature, a 75°C safety check and fixes for tough...
Read moreRubs for Pork Cuts, Timings and Flavours
See which rubs for pork suit shoulder, ribs, belly and chops, plus amounts, timings and safe UK cooking checks.
Read moreHow to Dry Rub Lamb by Cut and Cook Method
How to dry rub lamb by cut, with grams per kilo, rest times, grill and oven heat, and safe internal...
Read more