Burnt Ends Pork: A UK Guide to Smoky Cubed Perfection
You've got a foil tray of pork cubes on the smoker, the bark looks dark enough, and everyone at the garden table is asking when they can eat. The trouble is that burnt ends pork can be magnificent or disappointingly tough, dry, salty, or scorched. The difference isn't a secret American pitmaster trick. It's choosing the right cut, cooking it in two deliberate stages, and treating safety and texture as separate checks.
This UK-focused method uses a boneless pork shoulder, clean smoke, bold small-batch seasoning, and a covered glaze stage before the final lacquer. It also accounts for the realities of British outdoor cooking, where wind, changing weather and a hungry crowd can expose a weak process quickly.
What Burnt Ends Pork Actually Is
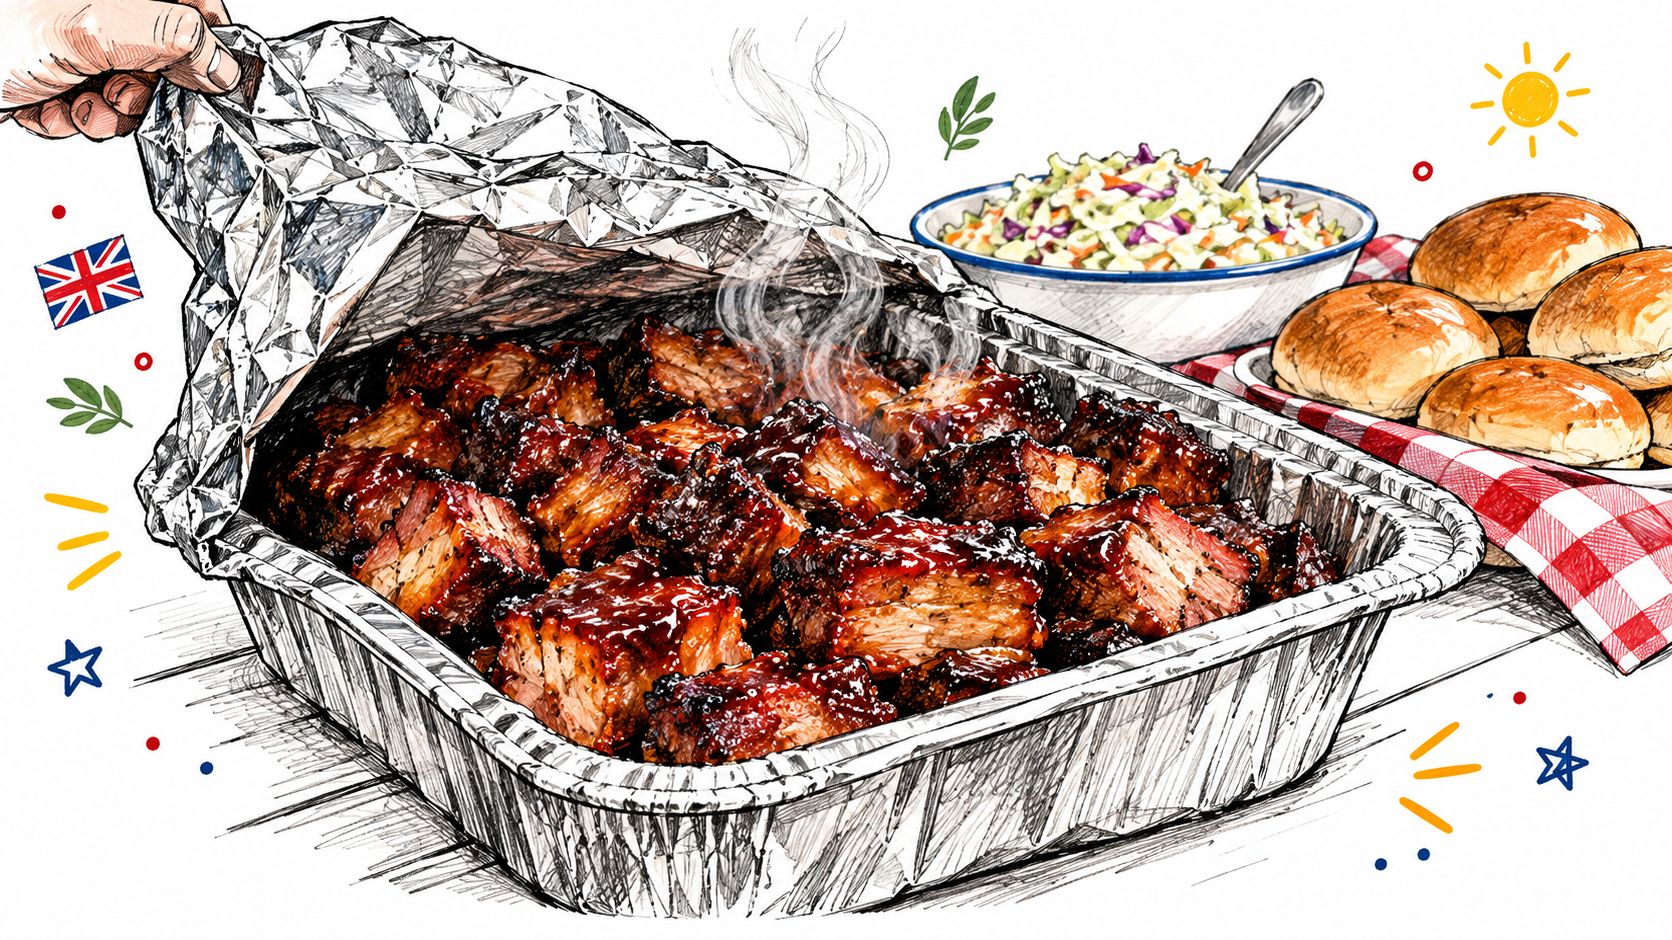
The foil comes back and the tray earns its place at the centre of the table. The pork cubes are dark at the edges, glossy with sauce and soft enough to yield under a fork. Steam carries smoke, rendered fat and caramelised seasoning across the garden, while the coleslaw and bread rolls wait for the first serving.

Traditional burnt ends began with the trimmed edges of a brisket point, repurposed by Kansas City pitmasters decades ago. Those pieces had more exposed surface, more bark and plenty of rendered beef flavour. The pork version is a modern adaptation that applies the same logic to a different cut.
The two pork routes
Most cooks use either pork shoulder or pork belly. Shoulder gives you a substantial amount of meat and a shape that's easier to cut into consistent cubes. It contains connective tissue that needs time to soften, but once it does, the finished pieces have a satisfying balance of bark and tender interior.
Belly takes a richer route. Its fat brings plenty of flavour and a luxurious texture, but the pieces can be harder to cube neatly and may become heavy if the glaze is too sweet. It's a good choice when you want indulgent bites rather than a meaty, bark-led tray.
Pitmaster's rule: Burnt ends aren't simply pork cooked until dark. They're a two-stage cook, smoke first, then cube, sauce and return the meat to heat.
That distinction matters. The first stage builds smoke and bark while the shoulder becomes tender. The second stage exposes fresh cut surfaces to sauce, rendered fat and heat, creating the sticky exterior people mean when they order burnt ends pork. If you want to compare the technique with its brisket relative, the beef brisket burnt ends guide is a useful reference point.
Ingredients, Rubs and Kit You Will Need
A boneless pork shoulder is the sensible starting point for a first cook. It gives you a broad surface for seasoning and produces more even cubes. Pork belly brings extra fat and richness, but the glaze needs closer attention because it can turn heavy or greasy.
Build flavour in layers. Start with SPG Salt Pepper Garlic Base Blend for a savoury base, then add Hickory Hog Pork Rub for sweet, smoky pork character. Swap in Cherry Force BBQ Rub when you want a stronger fruit note in the bark and finishing glaze. For broader guidance on choosing a BBQ rub for pork shoulder, match the seasoning's sweetness to the sauce you plan to use, rather than piling sweetness into every layer.
Your kit can stay straightforward: a smoker or indirect-heat cooker, an instant-read or leave-in probe thermometer, sturdy tongs, foil trays and a cutting board reserved for raw pork. Keep separate utensils for cooked meat. That separation matters in a warm outdoor kitchen, where one contaminated pair of tongs can undo otherwise careful handling.
Pellet smokers suit a mild fruitwood for pork. The Smokey Rebel pellets range offers a practical starting point, but clean airflow matters more than heavy smoke. Thick white smoke can leave the shoulder harsh and acrid. If you are still choosing equipment, use this guide to find the perfect smoking kit before buying accessories you may rarely use.
A shoulder, seasoning, reliable probe and tray will do the job. You need accurate temperature checks for both the meat's centre and the finished cubes, especially during the UK summer, when outdoor heat and wind can make a small cooker run differently from one cook to the next.
If you are choosing between a sweet and savoury stack, mix a teaspoon of each rub on a saucer and taste them side by side before seasoning the whole shoulder.
Smoking the Pork Shoulder
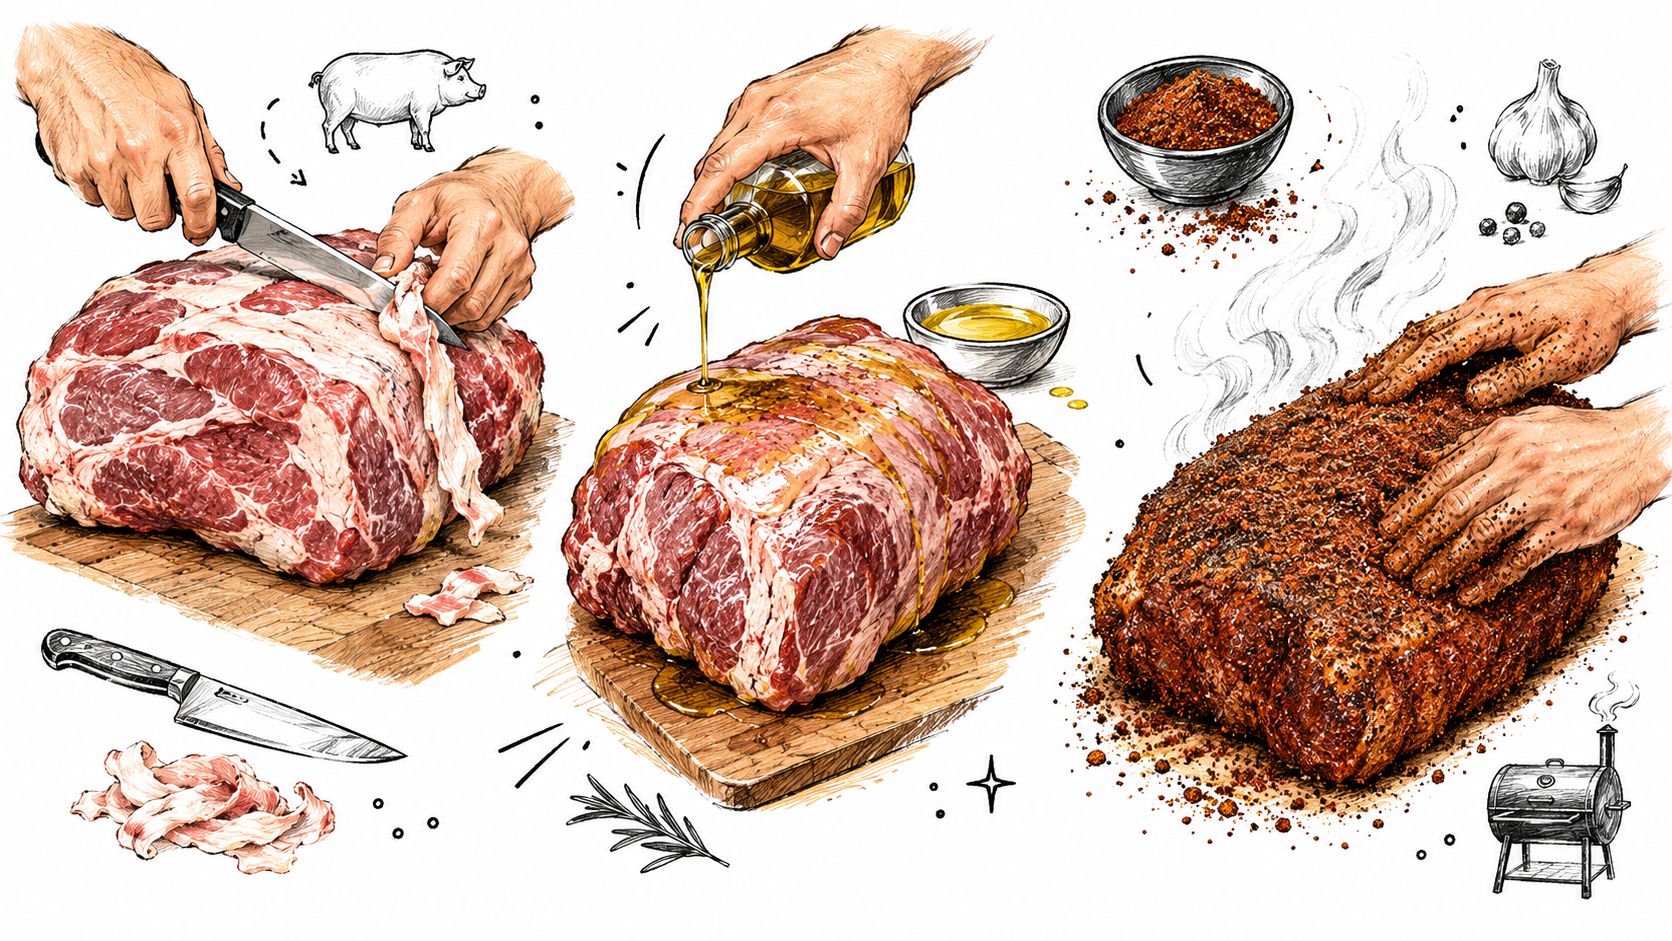
Trim the shoulder into a reasonably neat shape, removing loose flaps and thick, hard pieces of surface fat. Don't chase a perfectly square joint. You're trying to create an even cooking surface and remove anything likely to burn before the interior becomes tender.
Rub the meat lightly with oil, then press on the SPG followed by Hickory Hog. The seasoning should cling in an even coat rather than forming a thick crust that falls away when you handle the shoulder. Leave it while the cooker comes up to temperature so the surface becomes tacky and the rub settles.

Set the smoker for indirect cooking at 110–135°C. Add a mild fruitwood pellet and place the shoulder away from direct heat. Clean smoke should smell like toasted wood. If it smells acrid or makes your eyes sting, improve the airflow before the pork absorbs it.
The early phase is about bark formation. Resist the urge to keep opening the lid. Every unnecessary check releases heat and smoke, and it makes the cook harder to read. Once the shoulder enters the stall, evaporative cooling slows its progress. That's normal, not a sign that the fire has failed.
At that point, you have two sensible choices. Keep the shoulder unwrapped for firmer bark and accept a longer cook, or wrap it in foil with a small splash of apple juice to protect the surface and move it through the stall. Foil is practical for a family gathering, but it softens bark. Unwrapped cooking develops more exterior character, provided you can maintain stable heat and moisture.
Here's a visual reference for the preparation and smoking sequence:
Start checking for tenderness at the thickest point once the shoulder has had enough time to soften its connective tissue. A probe should slide in with little resistance. A fixed clock time isn't a reliable texture test because shoulder size, shape, airflow and fat content all vary. The pork shoulder on a BBQ guide gives you another way to think about the smoke stage.
Tenderness and safety are related, but they aren't the same test. UK Food Standards Agency guidance says pork should be steaming hot throughout, with no pink meat and clear juices. Its standard benchmark is 70°C maintained for 2 minutes, with equivalent combinations of 60°C for 45 minutes, 65°C for 10 minutes, 75°C for 30 seconds, or 80°C for 6 seconds (Food Standards Agency guidance). Use a clean probe away from bone. A long smoke doesn't, by itself, prove that every part of a large joint has reached a validated safe temperature-time combination.
Cubing, Glazing and Finishing the Burnt Ends
Once the shoulder is probe-tender, rest it briefly before cutting. Move it to a clean board, separate from anything used for raw pork, and use clean tongs and a clean knife. Cut the meat into 3–5 cm cubes, keeping the pieces close in size.
Uniform cubes finish at the same pace. Small pieces can dry or scorch before larger ones soften, while oversized pieces may stay firm in the centre as their exposed edges darken. Set the cubes cut-side up in a foil tray. That exposes the newly cut pork to the sauce while giving the bark a chance to hold its texture.
Mix a measured amount of BBQ sauce with a splash of rendered tray juices. Aim for a thin coating, not a pool around the meat. Add heat sparingly with Spitfire Spice Blend or Wingman Wing Rub. Both suit a more assertive finish, but extra seasoning at this stage can make an already salty sauce taste sharp.
Use the rub choice to control the final balance, not to repeat the smoke-stage seasoning.
| Rub | Stage-specific use | Pairing caution |
|---|---|---|
| SPG Salt Pepper Garlic Base Blend | Keep the smoke-stage coating light, then let the sauce provide most of the flavour | A salty sauce needs little or no extra seasoning |
| Hickory Hog Pork Rub | Apply at the smoke stage only; adding it to the glaze increases the salt load | Use a restrained amount with a concentrated BBQ sauce |
| Cherry Force BBQ Rub | Use a light dusting before smoking when the tray will receive a bright glaze | Fruit-forward seasoning can fight a very sweet sauce |
| Spitfire Spice Blend | Add a pinch to the finishing sauce for controlled heat | Taste before adding more, especially for children or mixed groups |
| Wingman Wing Rub | Stir a small amount through the glaze for a savoury, spicy edge | Its stronger finish can mask delicate smoke |
Cover the tray and return it to the smoker for 20–30 minutes. This warms the cubes through and gives the sauce time to settle. Uncover the tray for the final blast to set the lacquer. Keep the cooker under control because sauce sugars scorch quickly when exposed to high heat.
Stay beside the smoker during this stage. Rotate the cubes or stir them gently if one side darkens first. Before serving, use a clean probe in the centre of a cube. The check confirms that the cut, sauced pieces have reheated thoroughly, rather than relying only on the temperature reached by the original joint.
Troubleshooting Common Burnt Ends Problems
A failed tray usually tells you exactly what went wrong. Read the texture and surface before reaching for more sauce.
| Symptom | Likely Cause | Quick Fix |
|---|---|---|
| Rubbery or tough cubes | The collagen hasn't converted before cubing | Return the tray or shoulder to 110–135°C heat and give the pork more time before judging it again |
| Bitter or acrid bark | Dirty smoke, too many lid openings or fat rendering onto hot coals | Improve airflow, reduce flare-ups and stop chasing the cook with constant checks |
| Burnt sauce glaze | Sugary sauce added too early or an uncovered stage that's too hot | Cover the tray, add a small splash of juice and shorten the final uncovered finish |
| Dry cubes | The tray has no protective moisture and the pieces are overexposed | Add a splash of juice, cover the tray and let the cubes warm through gently |
| Little visible bark | The shoulder was cubed before the bark set, or the glaze drowned it | Use less liquid and give the cubes a short uncovered finish |
| Salt tastes aggressive | The rub or sauce supplied more salt than the pork needed | Use a lighter base rub next time and choose an unsalted or less salty sauce |
The most common texture mistake happens before the tray stage. Cooks see a dark shoulder, cut it immediately and then blame the glaze when the cubes remain chewy. Colour tells you about the exterior. It doesn't tell you whether the connective tissue inside has softened.
Another poor trade-off is adding the sweet sauce as soon as the pork is cubed. That gives the sugar too much time over heat and turns a potentially rich glaze into a bitter crust. Sauce late, cover first, then uncover briefly when you're close to serving.
A dark surface can be ready before the meat underneath is tender. Trust the probe and the resistance, not the colour alone.
Keep an eye on liquid as well. Too little and the cubes dry out. Too much and the bark turns soft and stewed. Burnt ends need enough moisture to stay succulent, but the finishing heat must still reach the exposed surfaces.
Serving, Storing and Reheating Burnt Ends
For a relaxed garden gathering, pile the cubes into brioche buns with quick-pickled onions and a sharp slaw. The acidity cuts through the rich pork and gives guests something they can eat standing up. A tray of buns also makes portioning easier than asking people to carve from a whole shoulder.
Loaded fries work well for a louder, messier serving style. Toss the chips with Chipotle Cowboy Chicken Rub, add the burnt ends, then finish with spring onions, cheese or pickles. For a Sunday lunch, serve the pork with slaw, warm cornbread and something green. The cubes are rich enough that the sides should bring freshness or crunch.
Leftovers need a controlled cooling routine. Move the pork into a shallow container, cool it rapidly, refrigerate it within 90 minutes, and use it within 2–3 days. You can freeze it for up to 3 months. These storage timeframes should be treated as part of the cook, not an afterthought, especially when a tray has been sitting at a busy gathering.
For reheating, cover the cubes in a foil tray with a splash of juice and use a 160°C oven until hot throughout. Outdoor cooks can give them a brief re-smoke, but keep the tray covered at first so the pork doesn't dry before the centre warms. Uncover only at the end to restore some surface tack.
Cold cubes also have a useful second life. Fry them with potatoes and onions for a smoky hash, fold them through fried rice, or use them as a wrap filling with pickles and crunchy salad. You've already done the long cook, so the next meal should be quick and hot rather than another complicated project.
Your Repeatable Burnt Ends Game Plan and FAQs
Keep this order beside the smoker:
- Rub stack: Apply SPG first, then Hickory Hog or Cherry Force.
- Smoke: Cook indirectly at 110–135°C with clean airflow.
- Tenderness: Wait until the shoulder probes with little resistance.
- Cube: Cut evenly into 3–5 cm pieces.
- Glaze: Sauce lightly, cover the tray, then uncover briefly to lacquer.
- Final check: Probe the centre of a finished cube and confirm a recognised UK-safe combination.
- Rest: Let the tray settle briefly before serving so the sauce clings and the pork stays juicy.
Can you make burnt ends in an oven
Yes. Use a roasting tray, apply the same seasoning and cook with indirect oven heat. You'll lose the smoke unless you add it separately, but the covered cube stage and short uncovered glaze still work.
Is a pellet smoker essential
No. Any cooker that provides stable indirect heat can produce good results. Pellets are convenient, not mandatory.
What is the minimum safe internal temperature for pork in the UK
The standard benchmark is 70°C for 2 minutes, with equivalent combinations listed in UK government cooking guidance. Use a clean probe and follow the temperature-time combination rather than relying on colour.
Can burnt ends be made ahead for a party
Yes. Cook the shoulder until tender, cube it and keep the pieces covered. Reheat thoroughly, then apply the final glaze and uncovered finish on the day so the exterior stays lively rather than soft.
Smokey Rebel offers small-batch rubs such as Hickory Hog, Cherry Force, SPG and heat-focused blends, alongside pellets and curated seasoning bundles for cooks building a reliable BBQ cupboard. Visit Smokey Rebel, choose your rub pairing, and put this burnt ends pork method to work at your next UK cookout.
Join our Mailing List
Sign up and get Smokey Rebel Recipes + weekly recipes straight to your inbox!
Recent articles
Burnt Ends Pork: A UK Guide to Smoky Cubed Perfection
Learn how to make burnt ends pork the right way. UK-safe temperatures, smoking times, glazing tips and Smokey Rebel rub...
Read moreHow to Season Steak for Grilling Like a Pro
Learn how to season steak for grilling with expert timing, rub choices and UK safety tips to achieve a perfect...
Read moreChipotle Seasoning for Chicken: A Practical Guide
Master chipotle seasoning for chicken with this practical UK guide. Learn dry rub and marinade techniques, safe cooking temperatures, and...
Read more